Recently, my team had the opportunity to put our app prototype, called WalletWize, in front of some Gen Z folks. The app is created to increase users’ financial literacy and to educate them on their own finances by incorporating them into the app.
Over the course of two meetings, several Zoom sessions, and more than a few awkward silences in the user testing, my group was able to collect feedback and create a solid foundation for the app.
But how did we get there?
Create a plan
Start with the basics of who you’re testing, how many there should be in the user testing, and what you want to learn from the testing. These things should be answered first before reaching out to any potential testers.
Our team had the goal in mind of testing Gen Z age people, which are people born between 1997 and 2012. Since this was our goal from the beginning, that metric was easy to define.
Since we already knew what age demographic we wanted, the next question is how many. The recommended amount of user testers is mentioned in Sprint: 5 people.
“The numbers of findings quickly reaches the point of diminishing returns. There’s little addiotnal benefit to running more than five people through the same study; ROI drops like a stone.”
– Jakob Nielsen, as quoted in the book Sprint by Jake Knapp, with John Zeratsky & Braden Kowitz from Google Ventures.
For this kind of early-stage testing of an app prototype, it’s important to remember that you don’t need too many people to get involved. Having too many people tell you their thoughts can get overwhelming, so sticking to 5 is an easier cognitive load.
When two or three people out of five have the same strong reaction – positive or negative – you should pay attention.
– From the book Sprint by Jake Knapp, with John Zeratsky & Braden Kowitz from Google Ventures.
You also have to remember that it’s your team that’s interviewing these folks, and that takes up a lot of time. 5 is the perfect number to get the testing done in one day.
Recruitment
Recruiting user testers doesn’t seem hard until you start asking people what their availability is. Working around schedules and getting materials from them before the testing can be very difficult.
My team was lucky enough that the day we chose worked for all of our testers. However, getting the consent forms from each participant was a hassle. The Adobe Scrobat document wasn’t working on their phones, so one had to print it out, sign and scan it back to us.
Setting up the study
Before the user study, we had to decide which prompts we wanted to ask the participants. We came up with a script that included an overview of our project and the reason for the study, some warm-up questions, the app-specific prompts, and some cool-down questions.
Additionally, I had to send out the Zoom link for the participants and the explanation of the timeslots. Included in that email was a pre-test survey and the consent forms. Then it was time to wait for the test.
User testing
We were very lucky that none of the participants showed up during someone else’s test. The Zoom malfunctioned and there wasn’t a waiting room available. So when the participants came in, we all had to quickly turn off our cameras, except for the interviewer and the partipant.
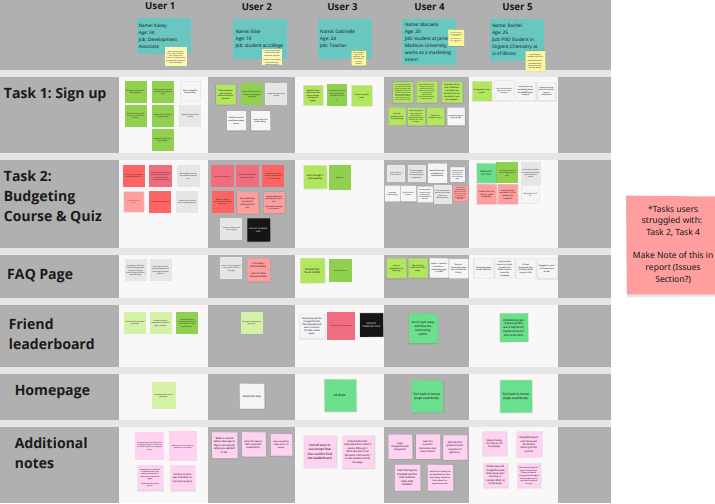
We then had to have the participant share their screen with the prototype presentation using Figma. The interviewer would follow the script while the other group members were timing each prompt, or writing sticky notes down on our Miro board.
There were some prompts that needed to be adjusted immediately, as the question itself was too ambiguous.
Post-test
After the testing is done, we met again to go over everything that happened during the study. Which prompts we felt the partipants struggled with, how long each promt took them, and our thoughts and feelings on other group members interviewing our friends.

Leave a comment